
Linux Priv Escalation and Lateral Movement With SSH Keys
- This article will be split up into two parts. In the first part we will look at the SSH service, its native files and commands and good practices around using it.
- The second part we will look at abusing many configurations.
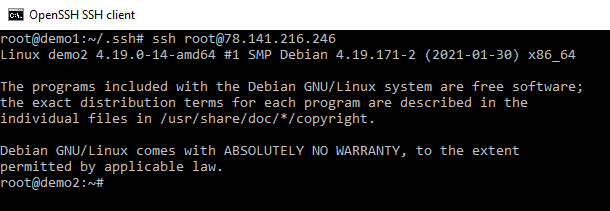
- For the examples in this article, I am going to boot up two Debian servers on Vultr.

Both Servers are version Debian 10 x64 (aka buster)
- I have named the hostname of the two server demo1 and demo2 to make it easy to discern between them
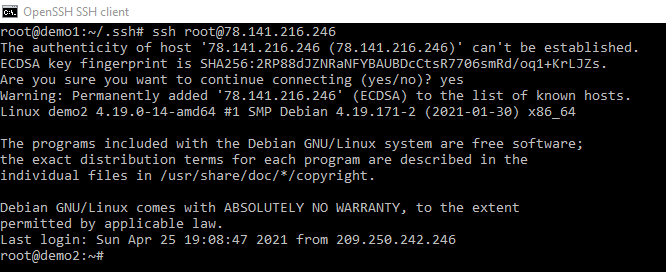
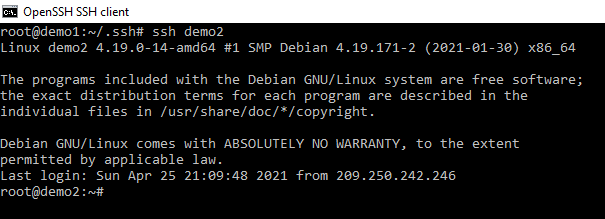
- When I first log in it asks if I want to accept the fingerprint which in this case is: “ECDSA key fingerprint is SHA256:du2f5e/Zux+XxuWWS/XdAc0ypC1OeAv5tGWUhWnaCSk”.
- Make a mental note of that as we will be coming back to that later on in this article.
- As this article is going to be on SSH keys I am going to start by generating a pair.
Generating an SSH Keypair
This is not an article on server setup so I am not going to go into great detail.
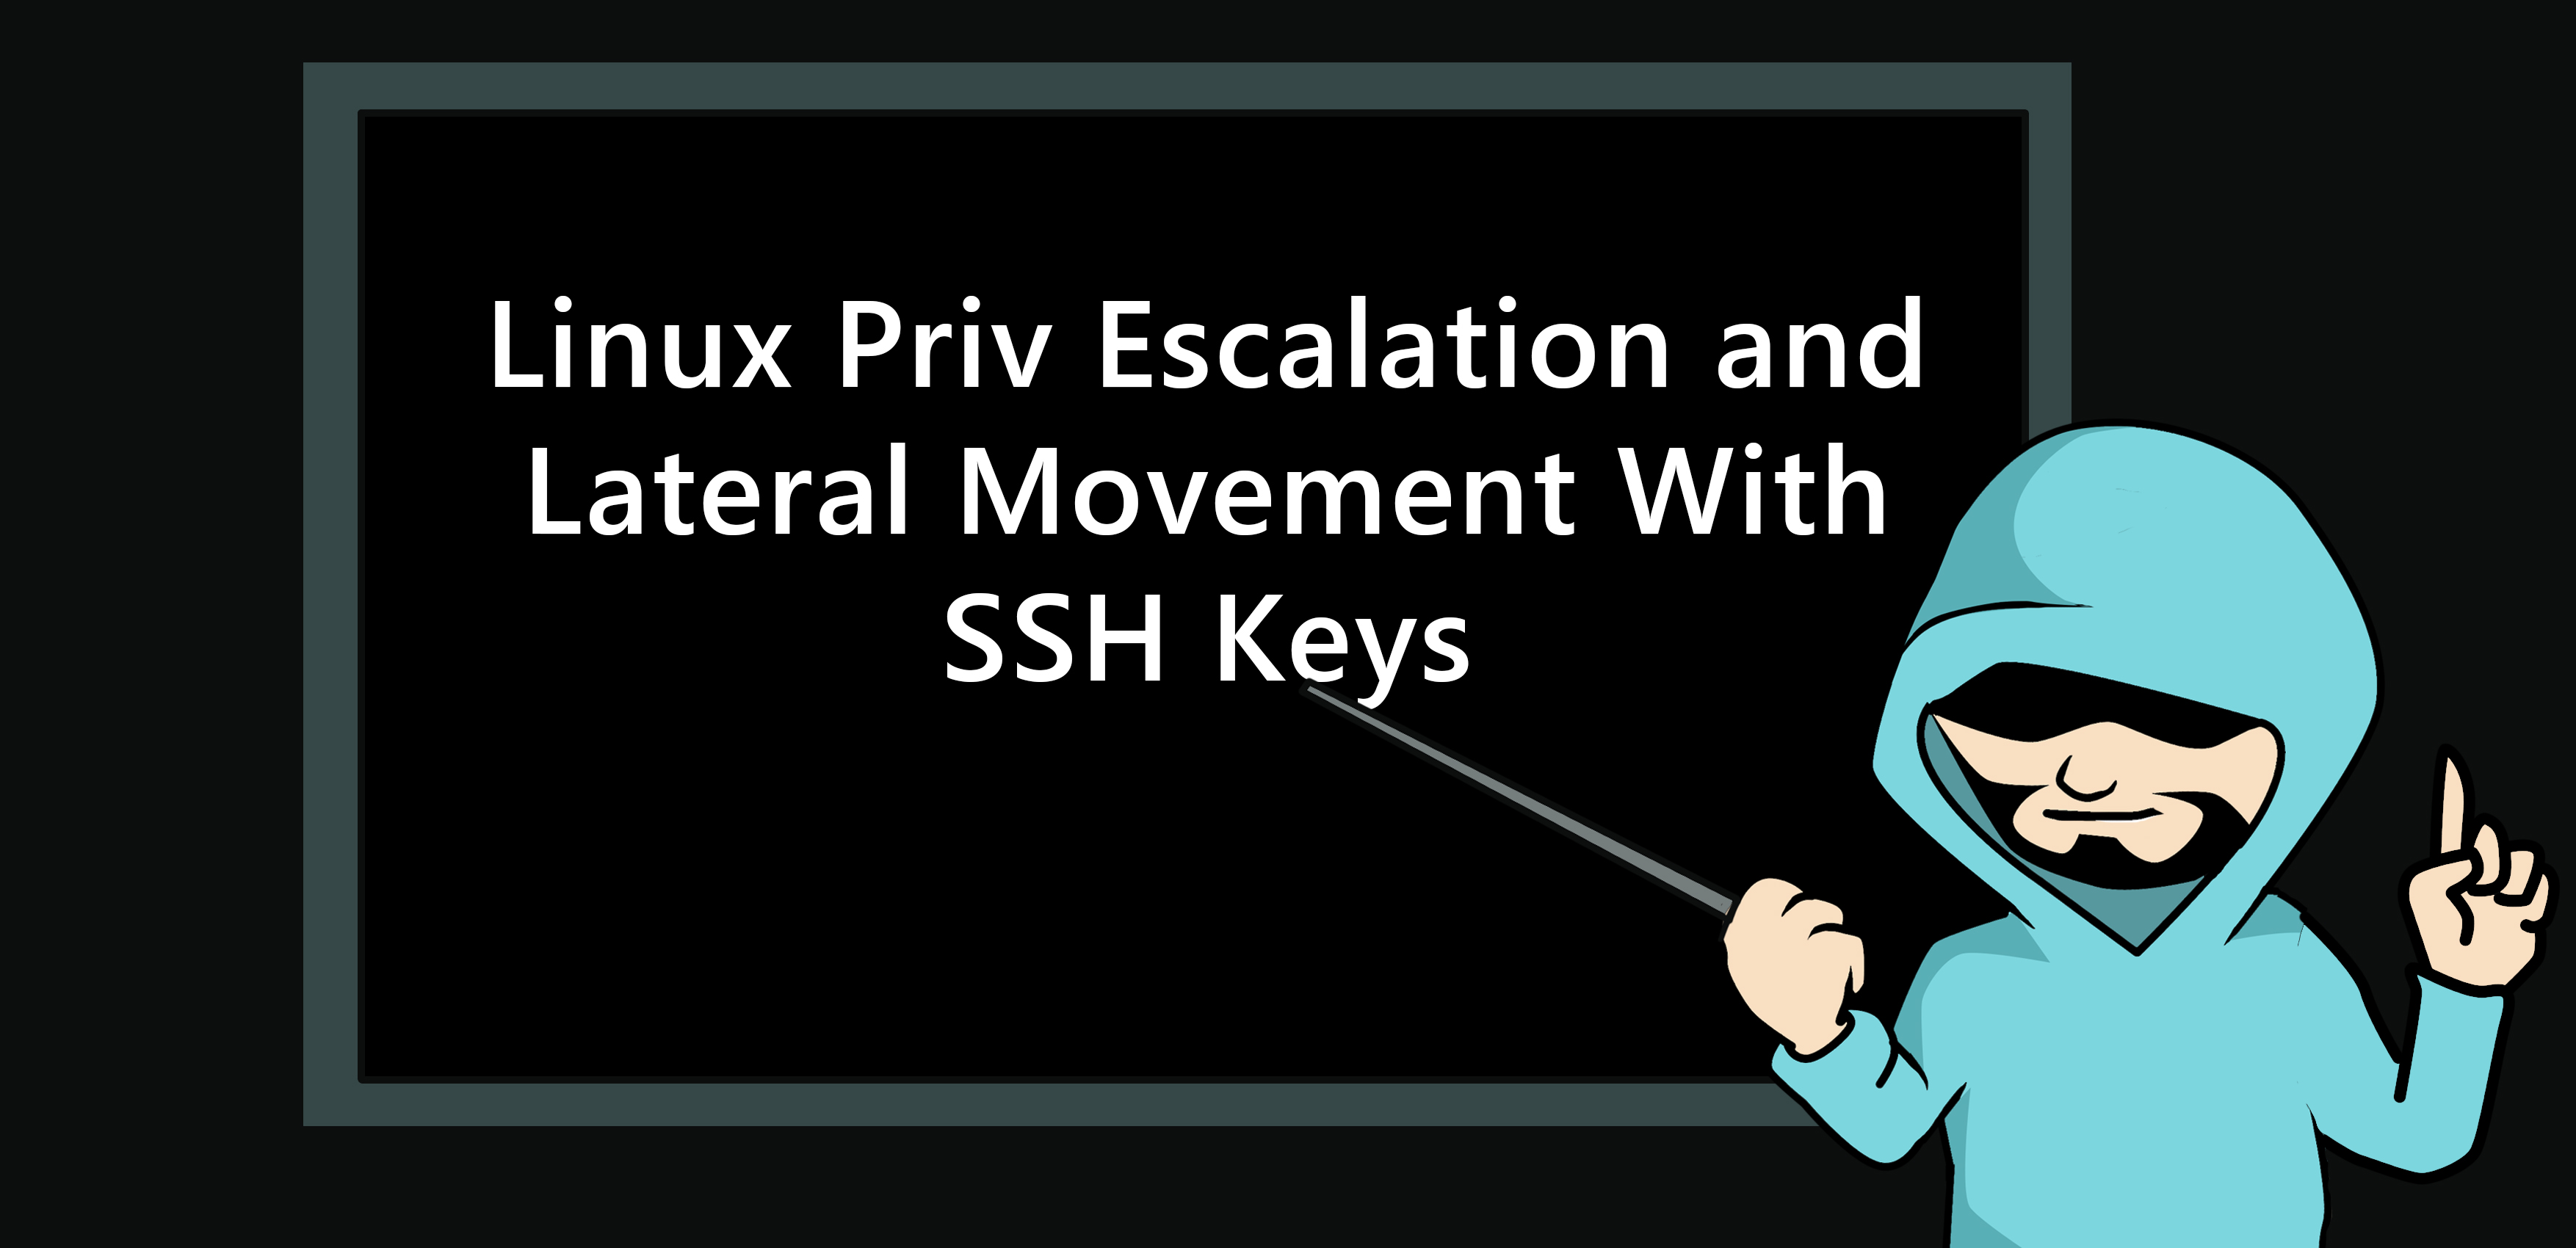
I am going to run the following command
ssh-keygen -t RSA -b 4096
The
-tspecifies the type and the-bthe number of bits of entropy.
Notice the fingerprint SHA256:ALLUbdUShgY5OJztlLokHF7cv8o1vooMPwJCvNti3z8
Looking at the SSH Dameon configuration
Let us open the configuration
nano /etc/ssh/sshd_config
Let us specifically look at the options that are commented out!
cat /etc/ssh/sshd_config | grep -E "^#"
The following were the default options found on this newly booted Vultr Debian server:
/#       $OpenBSD: sshd_config,v 1.103 2018/04/09 20:41:22 tj Exp $
/# This is the sshd server system-wide configuration file.  See
/# sshd_config(5) for more information.
/# This sshd was compiled with PATH=/usr/bin:/bin:/usr/sbin:/sbin
/# The strategy used for options in the default sshd_config shipped with
/# OpenSSH is to specify options with their default value where
/# possible, but leave them commented.  Uncommented options override the
/# default value.
/# Port 22
/# AddressFamily any
/# ListenAddress 0.0.0.0
/# ListenAddress ::
/# HostKey /etc/ssh/ssh_host_rsa_key
/# HostKey /etc/ssh/ssh_host_ecdsa_key
/# HostKey /etc/ssh/ssh_host_ed25519_key
/# Ciphers and keying
/# RekeyLimit default none
/# Logging
/# SyslogFacility AUTH
/# LogLevel INFO
/#  Authentication:
/# LoginGraceTime 2m
/# StrictModes yes
/# MaxAuthTries 6
/# MaxSessions 10
/# PubkeyAuthentication yes
/# Expect .ssh/authorized_keys2 to be disregarded by default in future.
/# AuthorizedKeysFile     .ssh/authorized_keys .ssh/authorized_keys2
/# AuthorizedPrincipalsFile none
/# AuthorizedKeysCommand none
/# AuthorizedKeysCommandUser nobody
/# For this to work you will also need host keys in /etc/ssh/ssh_known_hosts
/# HostbasedAuthentication no
/# Change to yes if you don't trust ~/.ssh/known_hosts for
/# HostbasedAuthentication
/# IgnoreUserKnownHosts no
/# Don't read the user's ~/.rhosts and ~/.shosts files
/# IgnoreRhosts yes
/#  To disable tunneled clear text passwords, change to no here!
/# PasswordAuthentication yes
/# PermitEmptyPasswords no
/# Change to yes to enable challenge-response passwords (beware issues with
/# some PAM modules and threads)
/# Kerberos options
/# KerberosAuthentication no
/# KerberosOrLocalPasswd yes
/# KerberosTicketCleanup yes
/# KerberosGetAFSToken no
/# GSSAPI options
/# GSSAPIAuthentication no
/# GSSAPICleanupCredentials yes
/# GSSAPIStrictAcceptorCheck yes
/# GSSAPIKeyExchange no
/# Set this to 'yes' to enable PAM authentication, account processing,
/# and session processing. If this is enabled, PAM authentication will
/# be allowed through the ChallengeResponseAuthentication and
/# PasswordAuthentication.  Depending on your PAM configuration,
/# PAM authentication via ChallengeResponseAuthentication may bypass
/# the setting of "PermitRootLogin without-password".
/# If you just want the PAM account and session checks to run without
/# PAM authentication, then enable this but set PasswordAuthentication
/# and ChallengeResponseAuthentication to 'no'.
/# AllowAgentForwarding yes
/# AllowTcpForwarding yes
/# GatewayPorts no
/# X11DisplayOffset 10
/# X11UseLocalhost yes
/# PermitTTY yes
/# PrintLastLog yes
/# TCPKeepAlive yes
/# PermitUserEnvironment no
/# Compression delayed
/# ClientAliveInterval 0
/# ClientAliveCountMax 3
/# UseDNS no
/# PidFile /var/run/sshd.pid
/# MaxStartups 10:30:100
/# PermitTunnel no
/# ChrootDirectory none
/# VersionAddendum none
/# no default banner path
/# Banner none
/# Allow client to pass locale environment variables
/# override default of no subsystems
/# Example of overriding settings on a per-user basis
/#Match User anoncvs
/#       X11Forwarding no
/#       AllowTcpForwarding no
/#      PermitTTY no
/#       ForceCommand cvs server
If it is not clear to anyone reading this! the lines starting with the # have been commented out.
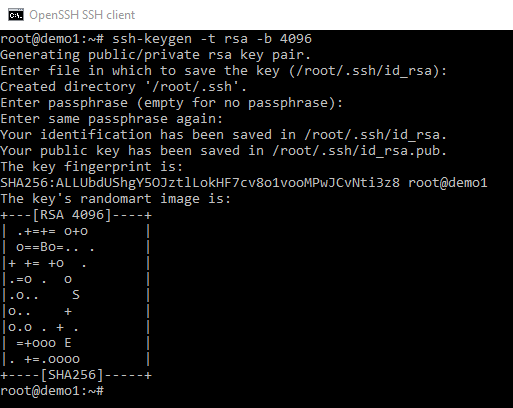
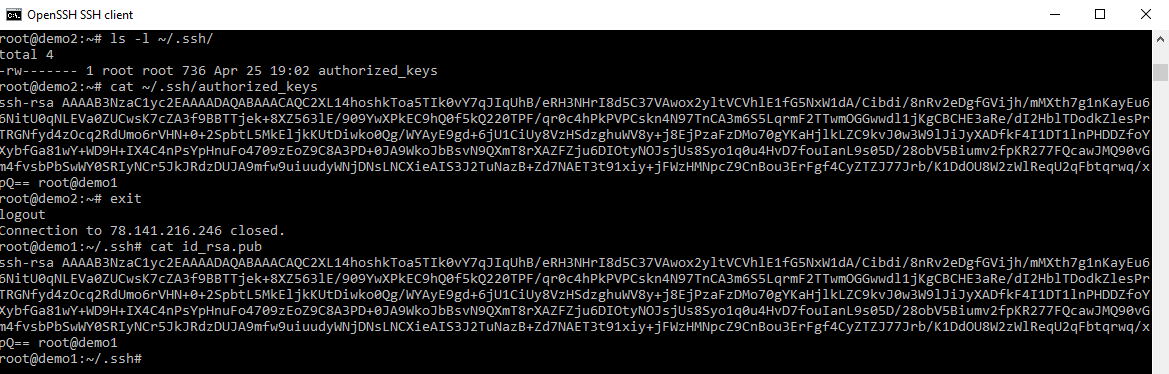
Let us have a look at the keys we just generated

the ~ is the shortcut symbol to the users home directory. We follow this with a . and then the name of the SSH folder (note lowercase).
The SSH folder starts with a
.as it is a hidden folder.
Looking at the screenshot we can see by just accepting defaults and pressing through the ssh-keygen command we have a public and private key in their default place (the users directory) and they have the appropriate permissions set.
Now for the next part of this article we are going to want the exact same key pair on the demo2 machine.
First though let us see one more use of the ssh-keygen command. Remember that SHA1 fingerprint from earlier.
So buy running ssh-keygen -l -v -f and pointing it as either the public or private key we can confirm that the fingerprint show matches the one generated.
MD5 is not recommended these days due to potential collisions however if you need to test fingerprints as MD5 you can use the following
# get the MD5 for private key
openssl pkey -in /path/to/privatekey -pubout -outform DER | openssl md5 -c

# get the MD5 for public key
openssl pkey -in /path/to/publickey -pubin -pubout -outform DER | openssl md5 -
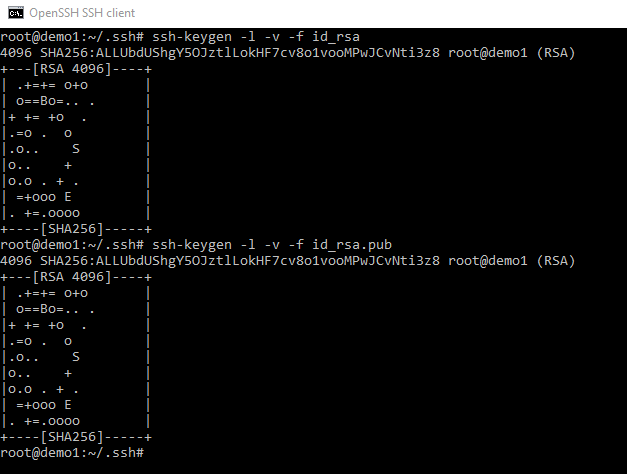
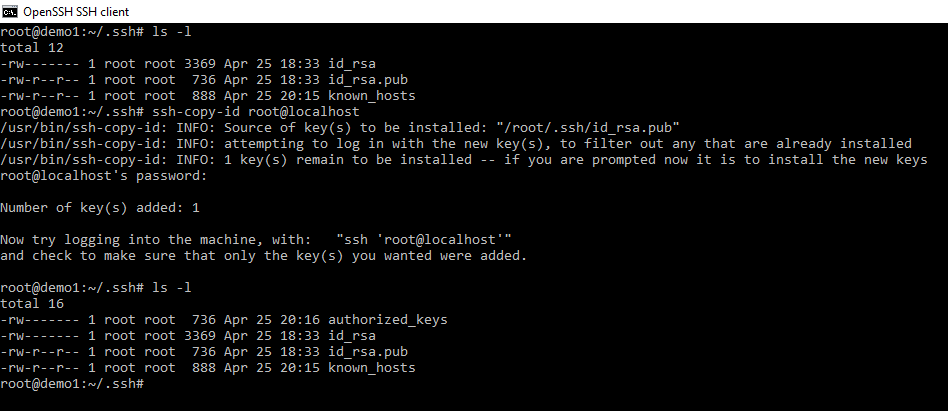
Copying Keys To Another Server
First I want to clarify some common mistakes. I know of other consultants who have thought they could use the following command to add the keys to another server.
Okay there is a lot happening in this picture and I want to break some of it down.
Firstly I have changed directory to the root of the server cd / to show you do not need to be in the same folder as the keys to use this command. Secondly we can see the servers current fingerprint just like we did with the first server. Notice the server fingerprint is not the same and any fingerprints we have generated or seen so far. If we look further down we can see that the first time I had to manually authenticate to the sever and then we can see that the number of key(s) copied were “Number of key(s) added: 1”.
Let us have a look what is going on.
Please note I have already SSH to the box so no fingerprint for me to accept in this screenshot.
Now let us examine the .ssh folder
- not keys have been copied across as the name in the command might suggest.
- the public key on demo1 has been added into the
authorized_keyson demo2 but theid_rsaprivate key andid_rsa.pubkey were not transferred. - Once an SSH key has been created, the ssh-copy-id command can be used to install it as an authorized key on the server. Once the key has been authorized for SSH, it grants access to the server without a password. That’s its function.
So know we have seen that the function of ssh-copy-id and how it does it job there should be little reason to worry about placing keys and authorized file entries into golden build images. You spin the server and then the admin (demo1) in this situation uses the ssh-copy-id.
Let us look at an alternative, up comes box 3.
The admin has a new machine deployed on his network. For the sake of simplicity, we have called it “demo3”.

With server 3 booted the admin on host “demo1” wants to be able to SSH into demo3. We know that the admins public key hosted on demo one needs to be placed inside the authorized keys of demo3.
Just for excitement as so you keep learning something new as you read. Let us not use the ssh-copy-id command.
cat id_rsa.pub | ssh root@95.179.138.81 'cat > ~/.ssh/authorized_keys'
cat ~/.ssh/id_rsa.pub | ssh root@95.179.138.81 'cat >> ~/.ssh/authorized_keys'
Two things should be noted. This time we do need to be in the directory of the SSH Public key folder or we need to put in an explicit path as in example two. The aim here is to to cat the public key and pipe it to the authorized keys.
We have two problems, however! 1) We don’t even know if this file exists yet which will result in an error. Secondly, it may be exist and have keys already in it that we don’t want to overwrite with a single “>” symbol.
If we just want SSH to run a command and return we can list it as the end of the ssh command.
ssh root@95.179.138.81 'ls -Rl ~/'
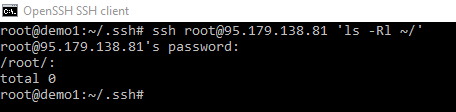
As we can see, the root folder is pretty empty and so out command would result in error unless we made a directory first. Now we have started this was we will continue but I just wanted to highligh some of the extra steps the ssh-copy-id command takes care of such as create the folders, files and getting the permissions right. However lets proceed.
Lets make the folder using the -p that creates any directories needed along the way.

Now lets copy the public key across.

So with the public key copied across, albeit a lot more work we should be in a position to SSH into that server without a password. It should be noted at this point we have a reasonably secure configuration with “demo1” being able to access “demo2” and “demo3”.
It should be noted that “demo3” could still connect back to “demo1” with a password. Not this might be behavior that is needed but if “demo1” is a jump box to other machines in the network we may want to harden “demo1” by adjust the config.
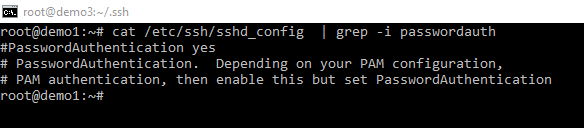
Password authentication defaults to “yes”, don’t want to lock yourself out of a box by accident now do we. Note, even though the field is not set and commented out it shows us the default behavior.
Now before I change around with config and potentially lock myself out of my admin jump box “demo1” I need to remember two things. Firstly I need the private key to log in. This can be grabbed from the local system by using the scp command.
scp root@demo1:/root/.ssh/*
I will get asked for my password but I will have my precious keys. However I STILL wont be able to login. The more observant of you by this point should be screaming your authorized_key file is missing.
We can run the ssh-copy-id on localhost but notice we still need to log in.
With that complete, we can edit the ssh configuration to stop password login from other boxes. This helps secure our jump box.
nano /etc/ssh/sshd_config
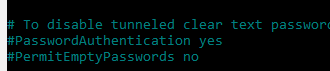
Let us uncomment that line and change it to no. Now Demo2 and Demo3 could not ssh to us without a private key and even if they brute forced the correct password for the root user it would not let them connect.

Lets restart the service and try it out.
systemctl restart sshd
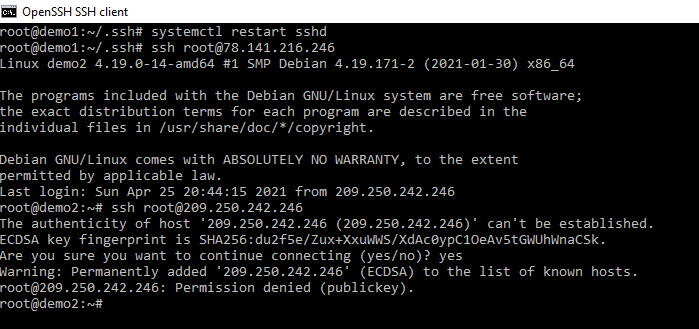
No prompt for a password and a message saying permission denied, something we have all seen on pentests.
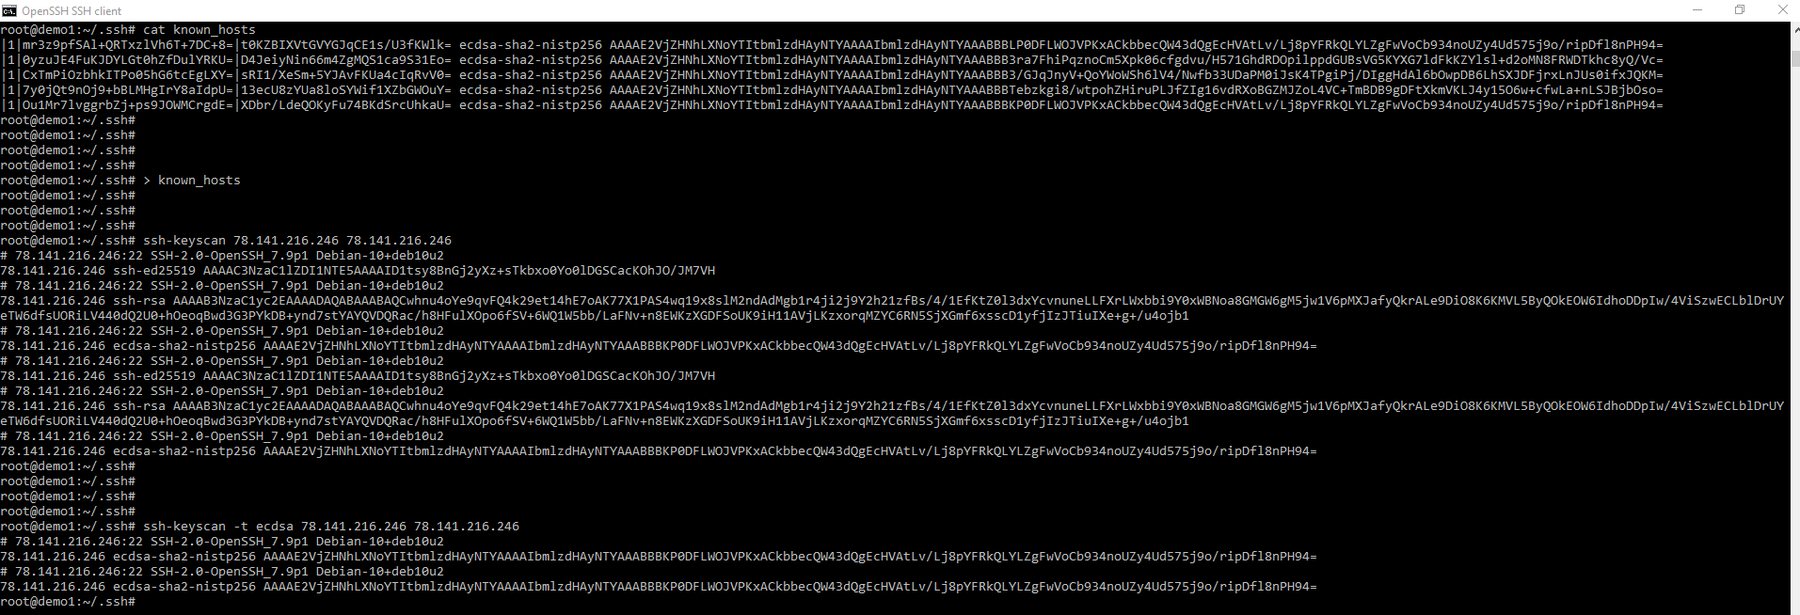
What is the known host
When we press “yes” to accept the fingerprints of servers that we login to their corresponding entries get added to known_hosts. If a server fingerprint changes for any one of a number of reasons and it no longer matches what is in the known host we get a warning next time we try and connect to that server.

Lets force one now
so despite connecting to that machine multiple times before we know have to once again accept the warning.....
When administering a lot of servers from your jump box, pressing yes all the time could end up being quite annoying. Is there another way?
Enter sshkey-scan
So lets have a look at this useful tool. I will admit in out three machine setup it is overkill but it does let us look at the options a bit easier.

So what is going on here! First, we can see the format of the original known_host file (the one I modified with ‘l33t’).
I have then emptied out the known host file due to the fact we are about to fill it. Please note that the known_host file hasnt been filled yet as we still have to redirect out command back into the the file. Before we get that far lets have a look when we don’t give ssh-keyscan a format for the known host file. Each IP I gave it was submitted as ed25519, ssh-rsa, ecdsa, and ed25519. In addition it fingerprints the end server boxes for their IP, ports and their operating system version and leaves it as a comment before each entry. This makes this a rather useful tool.
If you have more than the few machines that I have here then you can supply them as a file with the -f option.
Note, make sure you include machines you trust and you know haven’t been compromised. Regenerating the known hosts will remote the warning telling you if a host has changed since you last approved it so double check.
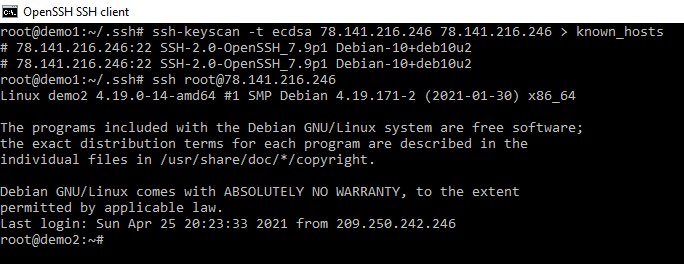
Lets create out known host file and check it out.
so let us run out command and see if we can login with no warning.
Now before I finish part one of this article; I do appreciate you staying with me while we go through the some of the configuration of the process. I just want to show you one more thing for the lazy admin… like me!
Config
The local SSH Config can allow us to do some very complex things. We will only cover some of the really useful features here
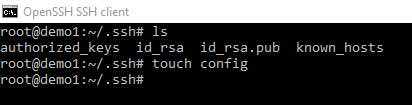
My “config” file for my jumpbox on demo1
Host demo2
        HostName 78.141.216.246
        User root

Host demo3
        HostName 95.179.138.81
        User root
Now with just ssh demo2 it replaces ssh root@78.141.216.246
Summary
In this first article, we looked at some of the SSH commands responsible for deployed Private Key Infrastructure with SSH. We look at a reasonable good practice with regards to making a jump box and got a general understanding of the difference between the config file, the known_hosts file, the authorized_keys and the public and private key.
In the second part of this article, we will expand on part one and go deeper into some of the configuration options and how they are often misconfigured to allow lateral movement, and complete network pwnage. I would however feel I miss-sold you on the title of the article if I didn’t show you one basic privilege escalation trick.
In the screenshot below the admin has backup his private key to a folder with the wrong permissions. Debbie has come along and found this key and has SSH into the host she is on. Debbie is now the root user and has a stable shell.
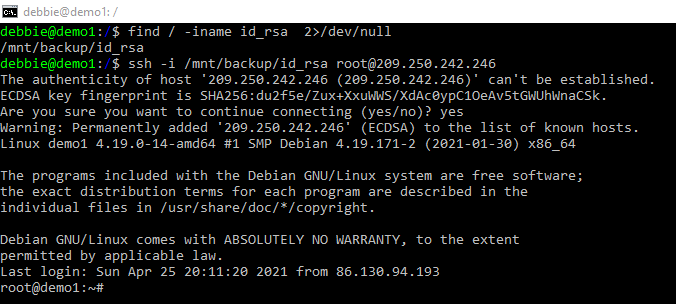
This trick was a little contrived but comes up frequently in capture the flag events.

Try and wrap your head around the basics we talked about today. Next article we will look at SSH Server configuration in detail and the things that often go wrong, we will look at piping tools through SSH, creating tunnels, moving laterally and will talk a lot more about SSH fingerprinting and how it can help us increase the attack surface.
Anonymous
You're not logged in; your comment will be anonymous.
Log in here to post from your account, or via your social media account:
0 comments
