
5 Uses for PowerShell on Pentests

1, Checking for duplicate files
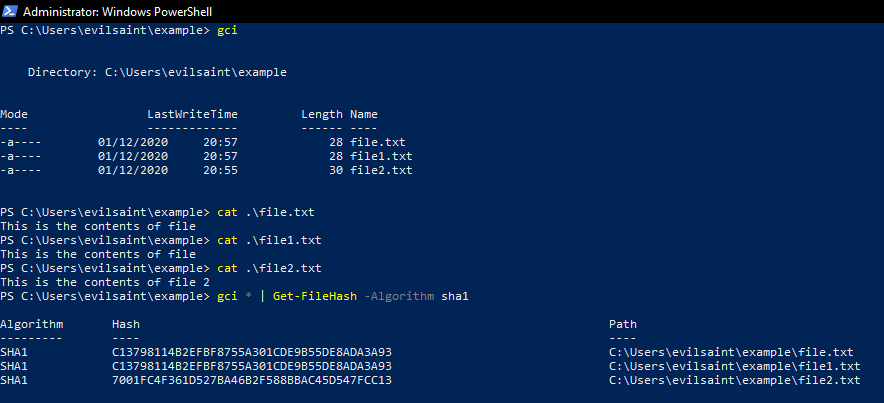
Finding duplicate files can be a tricky task, especially when you have 100’s of files spread all over your hard drive. An easy way is to compute the checksum of the files you would like to check and compare them. If we generate checksums for two files, we can declare that the two files aren’t duplicates if the checksums are different. If the checksums are equal, we can claim that the files are identical, considering that getting the same hash for two different files is almost impossible.
Collisions can occur with Sha1 and MD5, so it is recommended you either double-check with both algorithms (as a collision on both will be unlikely) or use an algorithm such as Sha512.
We can use the following function to get the checksum of any file.
Get-FileHash -Algorithm sha1 file.txt
The Get-FileHash algorithm attribute supports the following:
- SHA1 (160 bits)
- SHA256 (256 bits)
- SHA384 (384 bits)
- SHA512 (512 bits)
- MACTripleDES (64 bits)
- MD5 (128 bits)
- RIPEMD160 (160 bits)
2 Create ISO files
What are ISO files?
ISOs are a type of archive. The easiest way to think of an ISO file is more like a .zip or .cab archive file, only without the compression. An ISO file contains the image of a disk. That means it contains all the files and folders on that disk, much like a .zip or .cab file containing a collection of files and folders.
What are some of the benefits of ISO files.
- Chances of getting viruses in your file are reduced.
- Chances of your data being corrupt are reduced after creating an ISO file.
- A single ISO file can hold a whole batch of files and tools.
Using the code, we can find it at the following location. We can create an ISO file for storing tools and documents inside and mounting them inside our virtual machines.
To make the script easier to call, we will put it in our profile. See the following link for more information about PowerShell profiles and the appropriate location.
New-Item -ItemType Directory $Home\Documents\PowerShell\
New-Item $Home\Documents\PowerShell\Profile.ps1
notepad $Home\Documents\PowerShell\Profile.ps1

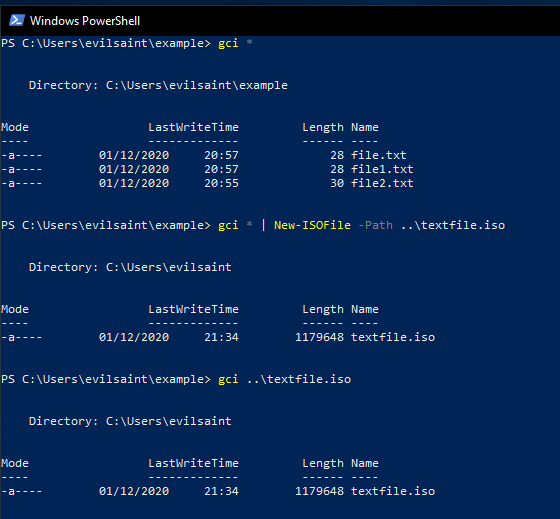
With the function saved in our profile, we can now create an ISO. Let us use the text files we created earlier.
gci * | New-ISOFile -Path textfile.iso
Lets now mount the disk and boot up our VM
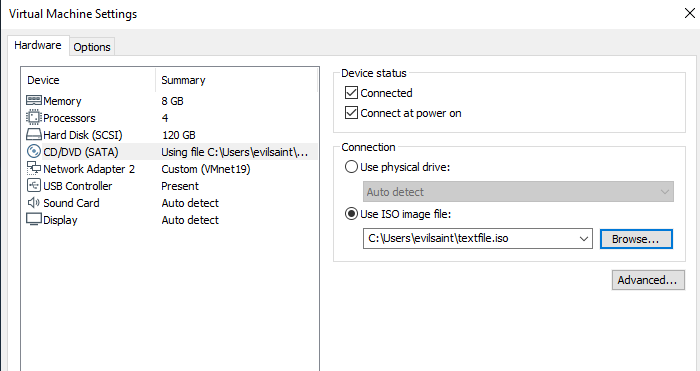
Setting the CD player path to the path of the ISO we just created.

The drive has appeared and seems to have content in it.
Let’s hit Ctrl + E to open up Explorer and navigate our mounted ISO.
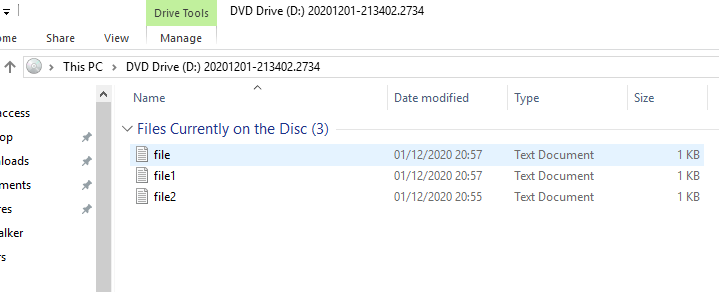
Out ISO contains the three files from earlier.
3, Using PowerShell to Show Server Response Headers
Using the Invoke-WebRequest or the valid and shortened iwr, we can retrieve interesting information.
The returned object from Invoke-WebRequest will allow you to see items such as the returned HTTP status code, the links on a page, the forms on the page and the returned server headers.
$request = Invoke-WebRequest https://evilsaint.co.uk
$request.StatusCode
$request.Headers
$request.RawContent > temp.html
What these Headers mean I will leave for a future article, but here is a useful reference in the mean-time:
The HTTP Response Headers List
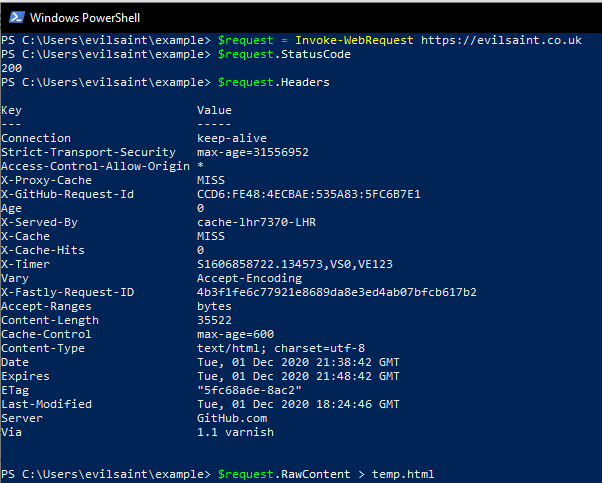
Here we can see the headers returned by the server when making a GET request to evilsaint.com
4, Checking what versions of SSL/TLS the server will support
“ssl2”, “ssl3”, “tls”, “tls11”, “tls12” | % {

    $TcpClient = New-Object Net.Sockets.TcpClient
    $TcpClient.Connect("evilsaint.com", 443)
    try {
        $SslStream = New-Object Net.Security.SslStream $TcpClient.GetStream()
        $SslStream.ReadTimeout = 15000
        $SslStream.WriteTimeout = 15000
        $SslStream.AuthenticateAsClient("evilsaint.com",$null,$_,$false)
        $KeyExhange = $SslStream.KeyExchangeAlgorithm
        $HashAlgorithm = $SslStream.HashAlgorithm
        $status = $true

    } catch {
        $status = $false
    }

    $TcpClient.Dispose()
    $SslStream.Dispose()

    Write-Host "$_ = $status"
    #Write-Host $KeyExhange
    #Write-Host $HashAlgorithm
}
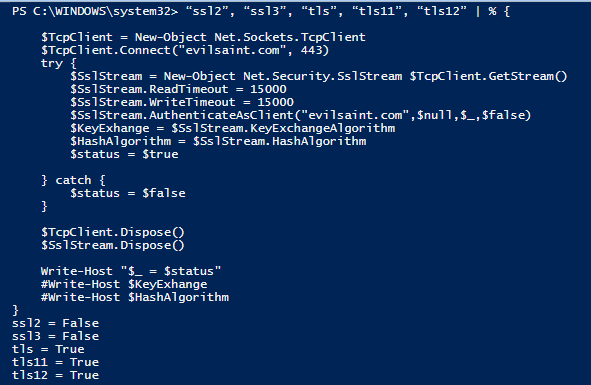
Here we can see that evilsaint.com does not support SSL version 2 or 3
5, Alive Hosts And Open Port Detection
While ideally, we would always have tools such as Nmap, Masscan and Hping3 to hand, sometimes, we just had to live-of-the-land.
To see if a host is alive, we can use Test-NetConnection to send an ICMP ping request.
Test-NetConnection evilsaint.com
If we specify a port, then PowerShell will attempt a TCP connect test to that port.
Test-NetConnection [evilsaint.com](http://evilsaint.com/) -Port 443
With a little scripting, we can use the Net Sockets TCP Client and loop through many ports like so
1..1024 | % {echo ((new-object Net.Sockets.TcpClient).Connect("[evilsaint.com](http://evilsaint.com/)",$*)) "Port $* is open!"} 2>$null
This can be quite a slow process.

Here we can see Port 22 has been left open :-)
Anonymous
You're not logged in; your comment will be anonymous.
Log in here to post from your account, or via your social media account:
0 comments
