
Automating Vultr Setup with Vultr API V1

API Endpoint: https://api.vultr.com/
API Key: Available in Members Area
Example
curl -H "API-Key: YOURKEY" https://api.vultr.com/v1/server/create --data "DCID=8" --data "VPSPLANID=201" --data "OSID=270" --data "APPID=17" --data "label=docker-test"
The code example is calling Vultr API to create new Server
--data "DCID=8" = "DCID":"8","name":"London" (server region)
--data "VPSPLANID=201" = "VPSPLANID":"201","name":"1024 MB RAM,25 GB SSD,1.00 TB BW" (plan)
--data "OSID=270" = "OSID":270,"name":"Ubuntu 18.04 x64" (Operating System)
--data "APPID=17" = "APPID":"17", "name":"Docker" (application)
--data "label=docker-test" = "label=docker-test" (server label)
cURL
GET request with no arguments.
curl "https://api.vultr.com/v1/os/list"
GET request that requires your API key.
curl -H 'API-Key: YOURKEY' "https://api.vultr.com/v1/server/list"
GET request with additional parameters.
curl -H 'API-Key: YOURKEY' -G --data "SUBID=12345" "https://api.vultr.com/v1/server/list"
POST request that requires your API key.
curl -H 'API-Key: YOURKEY' --data "SUBID=12345" "https://api.vultr.com/v1/server/start"
POST request with additional parameters.
curl -H 'API-Key: YOURKEY' --data "SUBID=12345" --data-urlencode 'label=my server!' "https://api.vultr.com/v1/server/label_set"
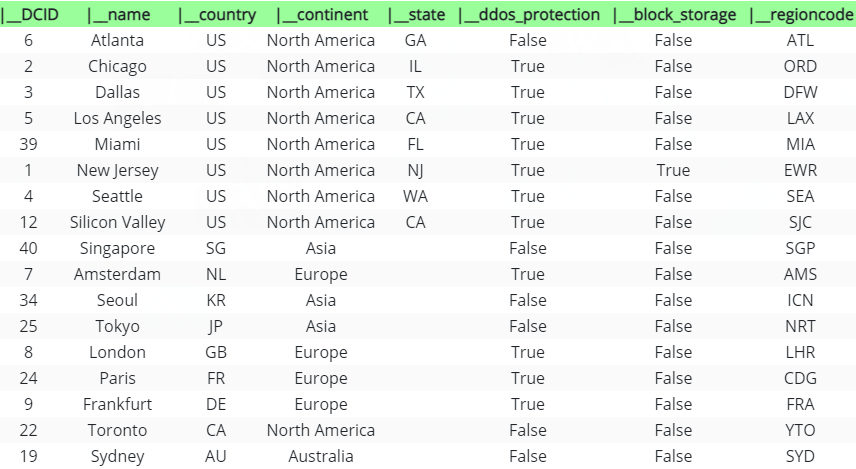
Server region
/v1/regions/list
Retrieve a list of all active regions. Note that just because a region is listed here, does not mean that there is room for new servers.
API Key Required: No
Request Type: GET
Example Request:
curl https://api.vultr.com/v1/regions/list
Example Response:
{
    "1": {
        "DCID": "1",
        "name": "New Jersey",
        "country": "US",
        "continent": "North America",
        "state": "NJ",
        "ddos_protection": true,
        "block_storage": true,
        "regioncode": "EWR"
    },
    "2": {
        "DCID": "2",
        "name": "Chicago",
        "country": "US",
        "continent": "North America",
        "state": "IL",
        "ddos_protection": false,
        "block_storage": false,
        "regioncode": "ORD"
    }
}
Example Parameter
--data "DCID=8" = "DCID":"8","name":"London" (server region)
List of All Regions
Plans
/v1/plans/list
Retrieve a list of all active plans. Plans that are no longer available will not be shown.
API Key Required: No
Request Type: GET
Example Request:
curl https://api.vultr.com/v1/plans/list?type=vc2
Example Response:
{
    "1": {
        "VPSPLANID": "1",
        "name": "Starter",
        "vcpu_count": "1",
        "ram": "512",
        "disk": "20",
        "bandwidth": "1",
        "price_per_month": "5.00",
        "windows": false,
        "plan_type": "SSD",
        "available_locations": [
            1,
            2,
            3
        ]
    },
    "2": {
        "VPSPLANID": "2",
        "name": "Basic",
        "vcpu_count": "1",
        "ram": "1024",
        "disk": "30",
        "bandwidth": "2",
        "price_per_month": "8.00",
        "windows": false,
        "plan_type": "SATA",
        "available_locations": [],
        "deprecated": true
    }
}
Example Parameter
--data "VPSPLANID=201" = "VPSPLANID":"201","name":"1024 MB RAM,25 GB SSD,1.00 TB BW" (plan)
List of all plans

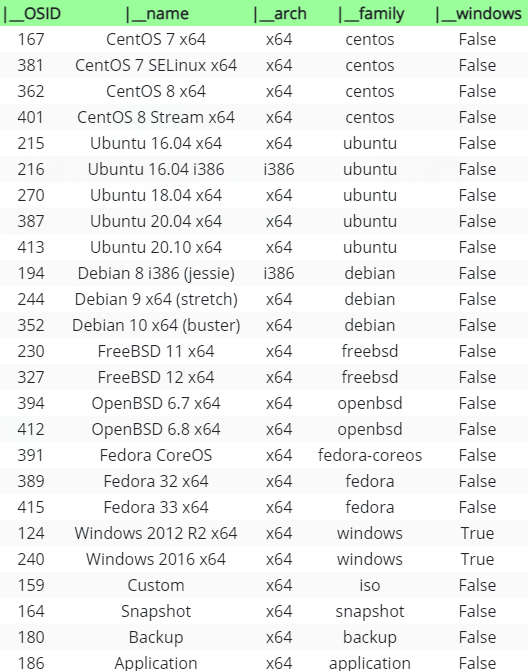
Operating System
/v1/os/list
Retrieve a list of available operating systems. If the “windows” flag is true, a Windows license will be included with the instance, which will increase the cost.
API Key Required: No
Request Type: GET
Example Request:
curl https://api.vultr.com/v1/os/list
Example Response:
{
    "127": {
        "OSID": "127",
        "name": "CentOS 6 x64",
        "arch": "x64",
        "family": "centos",
        "windows": false
    },
    "148": {
        "OSID": "148",
        "name": "Ubuntu 12.04 i386",
        "arch": "i386",
        "family": "ubuntu",
        "windows": false
    }
}
Example Parameter
--data "OSID=270" = "OSID":270,"name":"Ubuntu 18.04 x64" (Operating System)
List of All Operating Systems
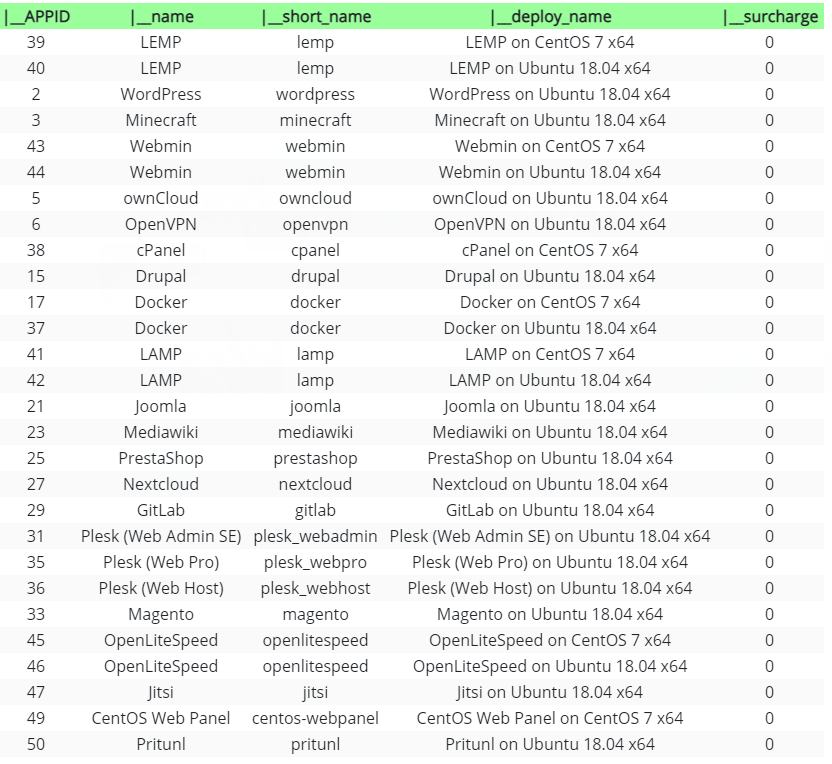
Application
/v1/app/list
Retrieve a list of available applications. These refer to applications that can be launched when creating a Vultr VPS.
The “surcharge” field is deprecated and will always be set to zero.
API Key Required: No
Request Type: GET
Example Request:
curl https://api.vultr.com/v1/app/list
Example Response:
{
    "1": {
        "APPID": "1",
        "name": "LEMP",
        "short_name": "lemp",
        "deploy_name": "LEMP on CentOS 6 x64",
        "surcharge": 0
    },
    "2": {
        "APPID": "2",
        "name": "WordPress",
        "short_name": "wordpress",
        "deploy_name": "WordPress on CentOS 6 x64",
        "surcharge": 0
    }
}
Example Parameter
--data "APPID=17" = "APPID":"17", "name":"Docker" (application)
Full List of Apps
The process in creating the docker container, finding the app id, the dc number, and creating it
Example Command
curl -H "API-Key: YOURKEY" https://api.vultr.com/v1/server/create --data "DCID=8" --data "VPSPLANID=201" --data "OSID=270" --data "APPID=17" --data "label=Docker-Server"
--data "DCID=8" = "DCID":"8","name":"London" (server region)
--data "VPSPLANID=201" = "VPSPLANID":"201","name":"1024 MB RAM,25 GB SSD,1.00 TB BW" (plan)
--data "OSID=270" = "OSID":270,"name":"Ubuntu 18.04 x64" (Operating System)
--data "APPID=17" = "APPID":"17", "name":"Docker" (application)
--data "label=docker-test" = "label=Docker-Server" (server label)
Destroy (delete) a virtual machine. All data will be permanently lost, and the IP address will be released. There is no going back from this call.
Example Request:
curl -H 'API-Key: YOURKEY' https://api.vultr.com/v1/server/destroy --data 'SUBID=576965'
Used this command to find your SUBID inside your Vultr Account:
curl -H 'API-Key: YOURKEY' https://api.vultr.com/v1/server/list
Example Response:
{
    "576965": {
        "SUBID": "576965",
        "os": "CentOS 6 x64",
        "ram": "4096 MB",
        "disk": "Virtual 60 GB",
        "main_ip": "123.123.123.123",
        "vcpu_count": "2",
        "location": "New Jersey",
        "DCID": "1",
        "default_password": "nreqnusibni",
        "date_created": "2013-12-19 14:45:41",
        "pending_charges": "46.67",
        "status": "active",
        "cost_per_month": "10.05",
        "current_bandwidth_gb": 131.512,
        "allowed_bandwidth_gb": "1000",
        "netmask_v4": "255.255.255.248",
        "gateway_v4": "123.123.123.1",
        "power_status": "running",
        "server_state": "ok",
        "VPSPLANID": "28",
        "v6_main_ip": "2001:0DB8:1000:0000:0000:000:0000:0101",
        "v6_network_size": "64",
        "v6_network": "2001:DB8:1000::",
        "v6_networks": [
            {
                "v6_network": "2001:DB8:1000::",
                "v6_main_ip": "2001:0DB8:1000:0000:0000:000:0000:0101",
                "v6_network_size": "64"
            }
        ],
        "label": "my new server",
        "internal_ip": "10.99.0.10",
        "kvm_url": "https://my.vultr.com/subs/novnc/api.php?data=eawxFVZw2mXnhGUV",
        "auto_backups": "yes",
        "tag": "mytag",
        "OSID": "127",
        "APPID": "0",
        "FIREWALLGROUPID": "0"
    }
}
Server List
List all active or pending virtual machines on the current account.
To determine that a server is ready for use, you may poll /v1/server/list?SUBID=SUBID and check that the “status” field is set to “active”, then test your OS login with SSH (Linux) or RDP (Windows).
The “status” field represents the status of the subscription and will be one of pending, active, suspended, or closed. If the status is “active”, you can check “power_status” to determine if the VPS is powered on or not. When status is “active”, you may also use “server_state” for a more detailed status of: none, locked, installingbooting, isomounting, or ok.
The “v6_network”, “v6_main_ip”, and “v6_network_size” fields are deprecated in favor of “v6_networks”.
The “kvm_url” value will change periodically. It is not advised to cache this value.
If you need to filter the list, review the parameters for this function. Currently, only one filter at a time may be applied (SUBID, tag, label, main_ip).
API Key Required: Yes
Request Type: GET
Required Access: GET
{% highlight PowerShell %}
curl -H 'API-Key: YOURKEY' https://api.vultr.com/v1/server/list
Example Response:
{
    "576965": {
        "SUBID": "576965",
        "os": "CentOS 6 x64",
        "ram": "4096 MB",
        "disk": "Virtual 60 GB",
        "main_ip": "123.123.123.123",
        "vcpu_count": "2",
        "location": "New Jersey",
        "DCID": "1",
        "default_password": "nreqnusibni",
        "date_created": "2013-12-19 14:45:41",
        "pending_charges": "46.67",
        "status": "active",
        "cost_per_month": "10.05",
        "current_bandwidth_gb": 131.512,
        "allowed_bandwidth_gb": "1000",
        "netmask_v4": "255.255.255.248",
        "gateway_v4": "123.123.123.1",
        "power_status": "running",
        "server_state": "ok",
        "VPSPLANID": "28",
        "v6_main_ip": "2001:0DB8:1000:0000:0000:000:0000:0101",
        "v6_network_size": "64",
        "v6_network": "2001:DB8:1000::",
        "v6_networks": [
            {
                "v6_network": "2001:DB8:1000::",
                "v6_main_ip": "2001:0DB8:1000:0000:0000:000:0000:0101",
                "v6_network_size": "64"
            }
        ],
        "label": "my new server",
        "internal_ip": "10.99.0.10",
        "kvm_url": "https://my.vultr.com/subs/novnc/api.php?data=eawxFVZw2mXnhGUV",
        "auto_backups": "yes",
        "tag": "mytag",
        "OSID": "127",
        "APPID": "0",
        "FIREWALLGROUPID": "0"
    }
}
Changing the plan should you need more space
Upgrade the plan of a virtual machine. The virtual machine will be rebooted upon a successful upgrade.
API Key Required: Yes
Request Type: POST
Required Access: POST
Example:
curl -H 'API-Key: YOURKEY' https://api.vultr.com/v1/server/upgrade_plan --data 'SUBID=39960375' --data 'VPSPLANID=29'
Saving a snapshot of your machine.
Create a snapshot from an existing virtual machine. The virtual machine does not need to be stopped.
API Key Required: Yes
Request Type: POST
Required Access: POST
Example Request:
curl -H 'API-Key: YOURKEY' https://api.vultr.com/v1/snapshot/create --data 'SUBID=1312965'
Example Response:
{
    "SNAPSHOTID": "544e52f31c706",
    "v2_id": "82f4a9f9-6d8b-44c8-ad59-6ade845bd2a6"
}
How to Use Docker: Creating Your First Docker Container
This tutorial explains the basics of getting started with Docker. I assume that you already have Docker installed. Steps in this tutorial will work on any Linux distribution that is compatible with Docker (CentOS, Ubuntu, etc).
Creating your first Docker container
Docker creates virtual containers. Docker’s container system is very efficient because it works with commits. This saves space, and allows you to see changes to the container. For example, if you install Apache in a container, you can create a commit with the name “Installed Apache” so you know exactly what happened.
The first thing we’ll do is pull from a repository. Say that you want to install Ubuntu in a container, you can pull Ubuntu from the repository:
docker pull ubuntu
Be patient, as this can take a while. After everything has been downloaded, you can create a container with this OS:
docker run -i -t ubuntu /bin/bash
Or with Debian, for example:
docker run -i -t debian /bin/bash
If it can’t find the OS (not pulled yet) it will automatically pull it from Docker Hub.
Effectively, you now have a container! You are running bash in the slimmed down container that is managed by Docker. Try running some common Linux commands to get a feel for the environment.
When you type exit to exit the container and return to your main OS, all of your changes will be gone. To save changes to a container, we use commits.
Commits
When you create a Docker container, its hostname is automatically generated. For example, when I create a new Ubuntu container, I might get the hostname f7943e42aff0. This is the name that Docker has given to your container.
Install what you want on it, and make sure everything works. Then exit your Docker container:
exit
We now need to commit; otherwise, all of your changes will be lost.
docker commit -a "William E." -m "Installed Apache" f7943e42aff0 apachesnapshot
The -a switch can be used to properly determine who authored that commit (who made the changes in the container). -m is the commit message. The f7943e42aff0 is the hostname of my container. In your case it will differ, as Docker generates them randomly. apachesnapshot is the name of your image.
You can view a list with all of the images on your local machine. The newest ones are at the top.
docker images
In order to start your Docker container with the changes, run:
docker run -t -i apachesnapshot /bin/bash
Using Dockerfiles
Dockerfiles can be used to make images with applications already installed. This makes it convenient to start a container without having to run a specific command. For example, if we want to create an image with the file ~/file.txt already created, we would use the following Dockerfile:
FROM ubuntu:14.04
MAINTAINER William E. <william@localhost>
RUN touch ~/file.txt
In order to create a Docker container with this Dockerfile, make a folder for your Dockerfile on your local machine (I used ~/files). Put the contents of your Dockerfile in a file called Dockerfile. You can now create an image with it by running:
docker build -t="test" .
This creates a Docker image from your Dockerfile script. You can now run your container. test is the same value as test in the docker build command.
docker run -t -i test /bin/bash
When the bash shell opens, you’ll see that the ~/file.txt has already been created.
This is just a taste of the powerful environments that you can create using Docker. The Docker official manual goes into much further depth on these topics. At this point, you should be able to experiment running existing containers and begin to start imaging your own.
You can learn more docker commands and functions here.
References
Anonymous
You're not logged in; your comment will be anonymous.
Log in here to post from your account, or via your social media account:
0 comments
